Nov 27, 2013

Tutorial - Fall Kids Craft - Pumpkin Bird Feeder

Now that it is cold out, our feathered friends are in search of food.  My son and I had such a good time creating this little pumpkin shaped bird feeder to help the birds out!


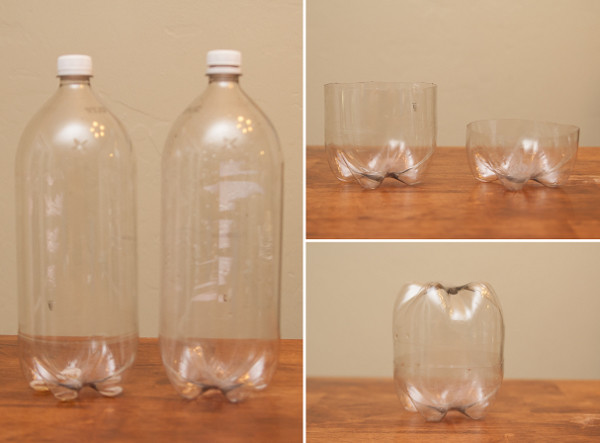
To make this feeder you just need two 2 liter soda bottles, a wooden dowel, a pipe cleaner, and acrylic paint.  The feeder requires a little adult prep work before the kids can paint and help assemble it. 

First, cute the soda bottles.  They have a spot at the bottom where they get a bit wider, cut one bottle there and the other about 1.5" above that spot.  Then the taller one should fit snugly inside the other.


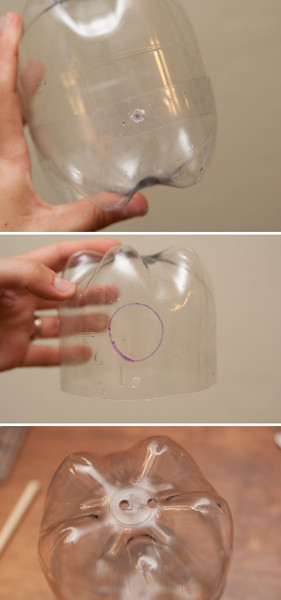
Make a hole in the shorter one just below where you cut and then directly across from that hole make a second hole.  I used a drill to make my holes but then later found that a regular hole punch like you would use on paper works well too.  

Put the two halves together with the taller fitting inside the shorter one.  Mark where the two holes go on the tall one, you need the dowel to go through both halves so it stays together when the birds sit on it. Take them apart and make the holes where you marked.

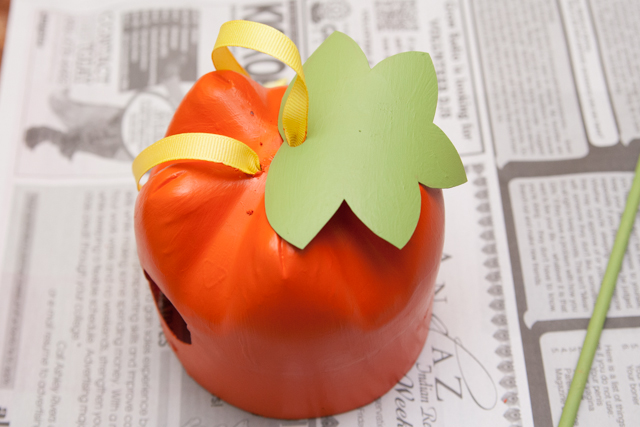
Cut larger holes for the birds to get the seeds, I used the bottle top to trace so my holes where fairly round and cut with a craft knife. 

Drill two holes in the top to hang.


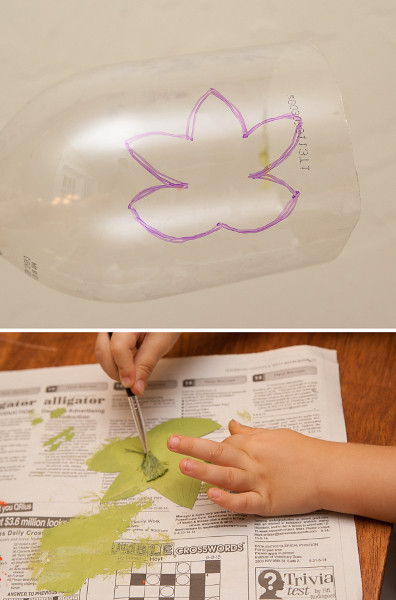
Cut a leaf shape out of the unused bottle.  You want to draw the leaf sideways on the bottle so it lays right after it is cut.  Poke a hole in the top of the leaf.


Let the kids paint away!  Once the paint drys, you can spray it with a clear varnish if you desire.


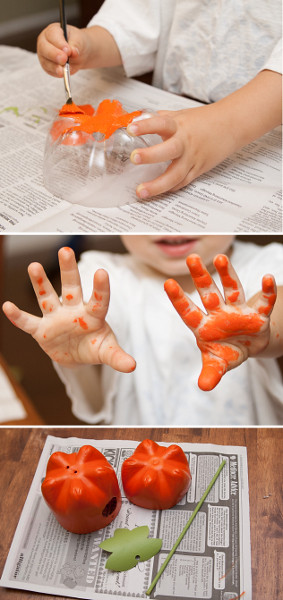
Assemble the feeder.  String a ribbon through the holes in the top to hang and add your leaf.  Curl a pipe cleaner around a marker to make a stem and slip it over the ribbon.  Then put your feeder halves together and push the dowel through the holes at the bottom.


Fill with bird seed and hang it out for the birds!

Nov 20, 2013

Tutorial - Rainbow Baby Quilt


I LOVE how this quilt turned out!  It may be my favorite of all the quilts I have made!  The rainbow colors on the front are so cheerful and could work for either a boy or a girl.  I chose a grey chevron for the back which is a bit unexpected with all the color on the front, and used some leftover squares from the front to make a rainbow chevron for the back.


This quilt would be a great project for a beginner, it is easy to make and the end result is stunning.  I know some people are a bit intimidated by the idea of making a quilt, but trust me, if you can sew a straight line, you can make this quilt! 


For the front of the quilt and the chevron on the back you will need some 5” x 5” squares.  The easiest way to cut squares of fabric is with a rotary cutter, a self healing mat, and a quilting square.  The number of squares of each color you will need is listed below:

                White: 56
                Red: 5
                Orange: 9
                Yellow: 14
                Green: 14
                Blue: 9
                Purple: 5

You will also need two rectangle for the back, one that is 35” x 7” and one that is 35” x 26”, and a piece of quilt batting about 36” x 40”.


Once you have all your squares cut, draw a diagonal line across all of your white squares.


Lay one white square on top of a color square with right sides together.  Sew on both sides of the line you drew, ¼” from the line.  Repeat with all your squares.


Cut along the line between the 2 seams so you end up with 2 squares.


Press the seam away from the white side. Repeat with all the squares.


Next you will sew the squares into 10 rows of 9 squares.  To sew the squares together, place 2 squares right sides together with the color side of one square lined up with the white side of the other.  Sew along the side; continue adding squares until all nine are sewn in a row.  Press the seams open.  Refer to the drawing below for the color order of each row. 


Once you have all the squares sewn into rows, sew the rows together.  Press the seams to one side.


Take the remaining squares and line them up to create the chevron pattern using three squares of each color.  Sew them into two rows like the ones shown in the drawing below.  Then sew the two rows together.  Sew your large rectangles for the back on either side of the chevron.


Next you will sandwich the batting between the 2 quilt layers.   I like to use a basting spray to hold everything in place while I quilt. You can find basting sprays in the quilting section of any fabric store.

Lay your quilt top out face down on the floor.  Spray the back of it with a basting spray.  Spread the quilt batting over the quilt top.  Spray more quilt basting spray on the batting then spread the quilt back face up over the batting. 

Quilt all three layers together by sewing straight lines along the vertical and diagonal seams of the quilt.  I find that a walking foot is really helpful for this step, it helps move all the fabric under your sewing machine foot. 

Find more tips on quilting HERE


After you finish quilting, bind the edges of the quilt.  I used a double fold binding that is machine sewn to the front and hand stitched to the back.  You can find more tips on quilt binding HERE.

Nov 19, 2013

Tutorial - Reversible Pillow Case

Looking for some last minute fall decor for your home?  This reversible pillow was my entry for the Fall Decor challenge over at SYTYC and it won first place!  It has a festive fall leaves design on the front and reverses to holly leaves do it can stick around through winter too!


I have seen reversible pillows before, but they always have one design on the front and one on the back.  I wanted this reversible pillow to have the second design hiding on the inside.  That way if the pillow falls off my couch or somehow gets flipped over, I don’t end up with a Christmas pillow in September.


This same concept could be used to create a pillow for any holiday.  Or you could even just pick two different fabrics.  Then when you get tired of one look, flip to the other.


To make this pillow, I used an off white home décor fabric and some craft felt to make the leaves and holly.  You can choose any fabric for the front; I recommend something with a bit of weight so it holds up better.  The envelope closure on the back is the same for both sides so if you choose two different fabrics for the front, make sure you choose something that coordinates with both for the back.  The fabric for the back also needs to be one without a right or wrong side, meaning both sides of the fabrics look the same.  Solid home décor fabrics are a good choice for the back.


The first step is to determine the size your case needs to be.  I had a pillow from Ikea for my insert, the tag says 20” x 20” but when I measured from seam to seam it was really more like 19”.  So I ended up making my case for a 19” x 19” pillow. 

Cut 2 squares of fabric that are 1” bigger than your pillow and 2 rectangles for the back that are 1” bigger than the pillow in length and half that plus 3”  in width.  For a 19” x 19” pillow I used two 20” squares and two rectangles that are 20” x 13”


Cut your leaves from felt.  I first sketched a leaf on paper to use as a template when cutting.  My leaves are about 1.5” wide and 2.5” long.  To cut the holly berries, I traced a nickel on a piece of paper you use as a template.  Pin your leaves in three rows on one of the pillow fronts, and then sew them on with a contrasting thread.


Repeat with the holly leaves on the other pillow front.


Finish one long edge of the rectangle by folding the edge over ¼” and then another 1” and topstitching along the folded edge.


Lay your fall leaves front face up and place one of the rectangles on top with the folded edge up.  Line up the three unfinished sides with the edge of the pillow front.  Lay the other rectangle on the other side with the folded side down.  Line up the raw edges with the edge of the pillow front, the finished edges of the rectangles will overlap in the middle.  Pin around the edges and baste stitch all the way around the pillow ½” from the edge.


Lay the Christmas side of the pillow case face down on top of the pillow backs.  You should have the fall leaves on the bottom, the Christmas leaves on top, and the back pieces sandwiched in the middle.  Pin around the edges and sew with ½” seam allowance leaving a 3” opening.  Make sure the opening is not right where the leaves are.   Clip the corners close to the seam to reduce the bulk. Turn the pillow through the hole you left open.  Fold the raw edge in and hand stitch the opening closed.


Your pillow is done!  You should have fall leaves on one side and holly leaves on the other.  Thanks again for voting for my fall leaves pillow!


Nov 18, 2013

Tutorial - Pomander Piñata

What’s a birthday party without a piñata?  This piñata combines the traditional candy filled party game with the flower pomander decoration that is so popular today.  This blushing rose piñata would be the perfect addition to any little girl’s party! 


This whole piñata costs less than $5 to make and I love it turned out.  I think it is almost too pretty to smash, but I know the kids won’t think twice about whacking it open to get to the candy inside! 


To make this piñata, start with a 12" balloon.  Make a paste by mixing one cup of flour and one cup of water.  Dip newspaper strips in the paste and lay them on the balloon.  Continue adding strips until the whole balloon is covered with 3-4 layers of paper, leaving a small hole at the top where the knot is.  Once the balloon is covered, tie a string around the knot and hang the balloon to dry.


Once the paste is dry, pop the balloon and pull it out through the hole you left.  Fill the piñata with goodies.  Poke two small holes on either side of the hole to string a ribbon for hanging.  Make a bit more paste and cover the hole with a few strips of paper.


To make the blushing roses, I used white crepe paper streamers and dyed the tips pink.  Put 2 drops of red food coloring in the bottom of a bowl and add 1 tablespoon of water.  Dip one end of the streamer roll in the dye then let it dry.  

Once it is dry, ruffle the streamers by running the edge through your sewing machine with your machine settings on the longest stitch length and highest tension.  


Make flowers by rolling the streamers and securing the bottom with a dab of hot glue.  I added some leaves cut from tissue paper to some of the flowers.  Glue the flowers to the piñata close together until the whole piñata is covered.


Your piñata is ready to party!

Nov 11, 2013

Tutorial - Upcycled Beach Bag from Thrift Store Skirt

This bag was my entry for the SYTYC upcycle challenge.  The challenge was conveniently scheduled for right after my annual family trip to the beach!  So right after I finished the bag I hit the beach with it, it saw lots of beach time.  I like that it is roomy enough for a couple beach towels and has a little pocket on the front so I can keep track of things like my phone and keys.


To make this bag, I started with a skirt I bought at the thrift store.  I took out all the box pleats at the top f the skirt and ended up with quite a bit of fabric.  You could also make this bag with 1 yard of fabric, something with a bit heavier works best.  You will also need two strips of iron on interfacing that are 25” x 3”, 8 grommets, a button for the front pocket, and 5 feet of rope.


I picked my grommets up at the craft store in the home décor section; they came in a pack of 8, perfect!  I got the rope at the hardware store; you can buy it there by the foot.


Start by cutting your fabric to two 20” x 25” rectangles.  Then cut 3” x 3” squares from the bottom corners.  You will also need cut two 9” x 9” squares for the pocket and two 6” x 4” rectangles for the handle covers.


Place the 9” x 9” squares right sides together and sew around all four sides leaving a small opening on the bottom to turn it right side out.  Turn the pocket through the hole you left and press it.  Add a button hole to the center top of the pocket.  Top stitch the pocket to the bag along the sides and bottom, make sure the opening in the bottom where you turned it gets closed when you top stitch.  Sew the button to close the pocket.


Iron your 3” strips of interfacing to the top of each side of the bag.  My fabric was already finished across the top from the skirt hem, but if yours isn’t you may want to leave ¼” of fabric above the interfacing to fold over when you hem so you have a finished edge. 


I sewed the bag with french seams so there are no exposed seams inside the bag.  To make the french seams, pin your bag wrong sides together along both sides and the bottom.  Sew the sides and bottom with ¼” seam allowance, leave the top of the bag and the 3” squares in the corners open. 

Turn the bag inside out and press.  Sew along the sides and bottom again, encasing the raw edge inside the seam allowance. 


Next you will sew the bottom corners.  Turn the bag right side out again; pull the top corners of the corner cut outs apart.  Line up the side and bottom seams and sew along the edge with a ¼” seam allowance.  Turn inside out press and sew over the corner again to make a french seam.  Repeat with the other corner.


Hem the top of the bag by folding it over at the bottom of your interfacing and sewing.

Measure 3” and 6” from the side seams on all sides and make a mark for your grommets.  Attach the grommets according to the instructions on the package. 

Fold the short sides of your handle covers over ½” and ½” again.  Press and top stitch along the folded edge.  Determine how big the covers need to be by wrapping them around your rope and marking where the raw edges meet.  Sew them right sides together at that point.  Then trim off any extra and turn them right side out. 


Weave your rope through the grommets starting by going in one of the middle grommets.  When you get to the middle of the other side, slip one of your handle covers on.  Then keep weaving until you get back where you started.  Slip the other handle cover on. 


 Sew the ends of the rope together by hand.  I used button thread and an upholstery needle.  Sew several places to make sure the handle is secure. 


Then slide your handle cover to cover the seam.  You can add a little craft glue under the covers so they don’t slide around if you want. 

Your bag is done, go hit the beach!


LinkWithin

Related Posts Plugin for WordPress, Blogger...
I love reading all of your comments! Please make sure your blogger profile is linked to your email, so I can respond to your questions via email, otherwise I won't be able to email you back!

Please feel free to email me(stitchedbycrystal@gmail.com).

Thank you so much for reading! I If you like what you have seen here make sure become a follower of my blog so you can catch all my updates!!